
I recently finished installing new low-voltage outdoor lighting on our property. The Lutron Caseta wireless switch worked perfectly as an outdoor light timer.
Configuring the Caseta wall switch is easy. There is a great deal of flexibility with scheduling your lights to come on and when to go off.
Installation only requires the Lutron Smart Bridge and downloading the free Lutron App for Caseta Wireless on your smartphone. This was a successful first smart lighting project.
The Landscape Lighting Products
The low-voltage lighting product I used was from VoltLighting. I'd done a lot of online research and found them to offer the best quality lighting product. They also had a lot of good reviews.
Our plan for these lights we first purchased was to install them on both sides of our driveway.
We recently built out in the country. Our driveway to the house is about 160 feet long. The 60 feet closest to the home is concrete, while the remaining one hundred feet to the road is crushed concrete.
This crushed concrete portion of the driveway also passes through the only woods or trees on our property. This part of the driveway is especially dark at night.
The fixture which both my wife and I liked best was the Coachman LED Path & Area Light from Volt Lighting. It is a beautiful fixture.

One of our reasons for selecting it was that it's one of Volt Lighting's tallest fixtures. By the time I added on the optional one-foot extension, it was about six feet tall.

This particular fixture from Volt Lighting was not their least expensive one. With all of the add-ons and shipping, this was a decent-sized project. I ended up purchasing most everything I needed before finishing our new home, as Volt offered a pretty good Black Friday sale last year. No sense in paying more than I have to.
The Landscape Lighting Property
The landscape lighting contractor we selected was me. I'd worked as an electrician earlier in my career. Due to an economic slowdown, I did not stay with that career-long enough the get my journeyman license. However, I am more than capable of doing our household wiring.
I planned to run regular AC voltage from the house to the transformers out by the driveway. Having outlets out on our property could be used for other functions.
I'd also read that longer distances of low voltage required heavier gauge wire. So I wanted to keep the low voltage runs shorter.
The goal was to get the lights installed before cold weather and snow. The first lights I installed were to help shine up the driveway, but the AC cabling was established to allow for future growth.
When we built the house, I had the electrician install a switch inside the house with the other porch lights. This switch would end up as my outdoor light timer. He then ran a wire from the switch's load side to the outside wall of the garage. The cable was stubbed outside into a weatherproof box and cover.
I had the electrician do the switch wiring while building to save money instead of doing it later.
I simply needed to get the AC from that box to the new Volt transformers on either side of the driveway's crushed concrete portion.
The length involved about 120 feet from the house to the first transformer. Then it was another 60 plus feet across the driveway and some woods to the second transformer.

Project Scope Creep
Without boring you entirely to death, this ended up being quite the project. Like any other project, the scope creep happened.
My initial plan was to cut down six pine trees, which were too close to the driveway. These were some of my most giant pine trees on the property. The stumps had to come out or cut below ground level also.
The driveway was already too narrow, and I didn't want the new lights on the very edge of the driveway. There was no way to make it through the winter with snow plowing or bad drivers backing out.

With the next plan change, I decided to run two sets of PVC conduit, a 3/4" for the AC wiring and another 1" for Ethernet cabling in the future. At some time, I want to install several outdoor IP cameras.
I later decided to run the PVC conduit to the back of the house, where I could access it from the basement. This additional conduit run would allow me to run new electrical circuits out to the property, along with accessing my network switch with the CAT 6 cabling.
While the additional conduit was short, the change in plans cost the family a weekend without broadband as I dug up the fiber cable, even though I had "Miss Digg" mark it out.
Finally, since I'm digging a trench, I should also run a drainage pipe from that corner of the house. Even though the drainage pipe was much shallower, why dig it twice?

The final scope-creep add-on was adding a turnaround for the driveway. Since it's a long driveway through the woods, there needs to be a spot closer to the house for cars to turnaround.
Naturally, this required another half-dozen pine trees to be cut down and two massive loads of crush-concrete. Fortunately, the removal of the stumps was unnecessary.

When we moved into the house, I reasoned with my wife that I needed a new John Deere 1025R sub-compact tractor to do much of the property work myself. Well, I'm glad I had the tractor and the chain saw. But I was a little under-powered for some of the stumps alongside the driveway.
All-in-all, the project turned out well, and the lights looked beautiful. I had two post lights at the end of the driveway by the road. Then more lights at a couple of intervals up to the concrete portion of the driveway. I did have to buy two more fixtures to put alongside my new driveway turnaround.

The lighting fixture has a candle type bulb that you can see. Underneath the canopy is another 4W LED light (35W Halogen Replacement) bulb for down-lighting.

Hopefully, the night time view below shows OK, but the lights illuminate enough to see where you are going without lighting up everything—a nice gentle glow. The next step is to install the outdoor light timer.

Using the Lutron Caseta Switch as an Outdoor Light Timer
As mentioned earlier, the electrician who wired the house installed a switch inside the front door, which we could use to turn the new driveway light on and off. However, I didn't want to have to do this manually every night. I wanted an automatic outdoor light timer.
Volt Lighting offers timer and photocell options to use with their low-voltage transformers. However, once these options are installed and configured, you have no way to change the settings other than to go out in the yard.
Also, I didn't want the lights on all night (photocell option), and I also wanted to turn them on or off manually. Again, doing this without going into the woods and adjusting the transformer timers.
The Lutron Caseta Wireless switch gave me the following control options for our new landscape lights:
I could later add a Pico remote control switch also to control the lights from the garage. Right now, I don't feel that is necessary.
Installing the Lutron Caseta Wireless Switch
Caseta Model PD-6ANS-WH - Back Side
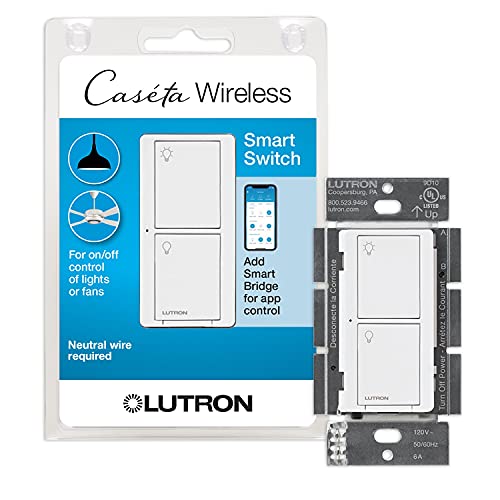
The Lutron switch I used was the Caseta wireless on/off, Model PD-6ANS-WH. You can use it in either single-pole or three-way applications. There are no screws on the switch's side for installation, just wires hanging out the back with a package of four wire-nuts included.

Caseta Model PD-6ANS-WH - Front Side
The front of the switch is simple. The top button turns the lights on. In contrast the bottom button turns the lights off.
This switch is NOT one of their dimmer switches. Dimming is not something I wanted to do with the AC power going out to low-voltage transformers.

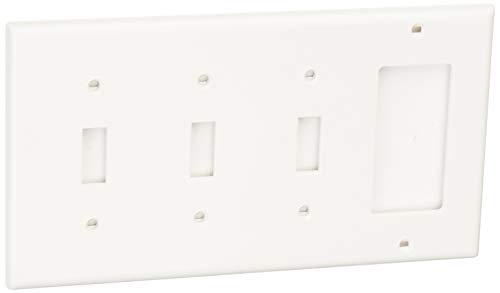
Four-Gang Switch Wallplate
The switch I was replacing was in a bank of four switches. I chose not to replace the wall plate with a new Lutron Claro plate as I wanted to replace more of these switches in the future.
Slower Migration from Old Switches to New Wireless
There is a decision to make when replacing standard switches with an expensive smart wireless switch. Replacing all four switches would be a good chunk of money.
I could have replaced the other switches with a simple Lutron Claro switch for about $6. My choice was either that option or buy a new wallplate each time I replace a switch. I chose the new wallplate option.

Converting the Existing Driveway Light Switch Into a Caseta Outdoor Light Timer
1
Removing the Existing Switches
Installing the switch is relatively simple. Removing the switch cover reveals a bit of a mass of wires. Of course, the switch I was replacing is on the far right side, and the neutral wire connection I needed was on the far left side. So I had to remove all four switches.

2
Locate the Neutral Wires
I don't like to disturb the original wiring any more than I have to, especially with full electrical boxes like this one. There were already many white, neutral wires, so I pulled them out and removed the wire nut.

3
Prepare the Neutral Wire Connection
I chose to add another 10" chunk of 14 gauge neutral wire to this connection and pushed the whole wad of cables back into their original position. This short wire added allowed me to connect the neutral from the new switch without stretching it to the other side of the box.

4
Locate the Live Wire
The hot wire was easy to identify as it jumpered from switch to switch.

5
Locate the Load Wire
The remaining wire from my old switch would be the load wire, so I had everything I needed to know for connecting the new switch.

6
Connecting the New Smart Switch
Removing the old switch was easy by cutting the wires next to the switch. I then stripped and wire nutted them to the new Caseta switch.
Since the Caseta switch is usable for three-way applications, there is an extra blue wire, which I did not need. The instructions said to put a wire nut on it, which I did. However, I first bent the stripped portion of the blue wire back so that the wire nut would not fall off.

7
Reattach All the Electrical Switches
Since I put all the cables back where I found them, screwing the switches back into the box was simple. It's usually never a good idea to use the pressure from screwing the light switches to push your wires back into the box.

8
Switch Wallplate Modification
The only tricky part of this installation was that the new wallplate required some modification. The trim option we added for the front foyer was not accounted for when the electrician installed the rough-in box. As a result, I needed to trim off about one-eighth of an inch from the plate's bottom.

9
Ugly Switch Wallplate Modification
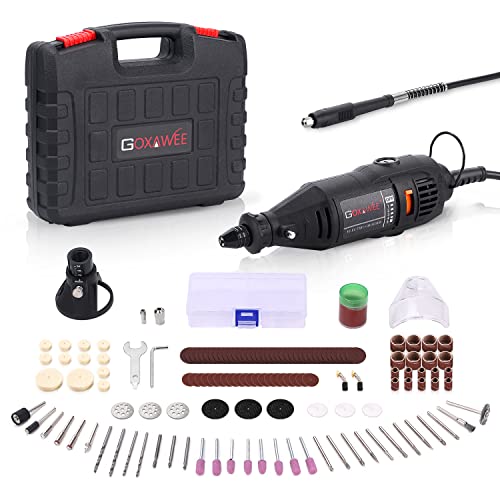
I used an inexpensive rotary tool kit I found on Amazon, but I'm not happy with the result. It covers the switches for now, but I'll be revisiting this issue soon.

Installing the Lutron Caseta App
I wrote a separate article on just the steps required to Install the Lutron Caseta App.
Programming the New Lutron Caseta Switch
Once you've installed the Caseta app, configuring your new wireless smart switch is pretty straight forward.
Install Devices
Step 1 - Caseta App - Add Device
The first step is to select the Add Device option from your settings menu. For me, I'm installing a Caseta In-Wall switch.

Step 2 - Caseta App - In-Wall Pairing
The Caseta app then instructs you to press and hold the bottom button for 10 seconds until the LED blinks quickly. This process allows it to pair with your Lutron Caseta Smart Bridge.

Step 3 - Caseta App - Add Room
The app then walks you through adding a room name. There are some common ones to select from, but the driveway was not one of them. So I chose to add.
Lesson Learned
You don't want to add the word "lights" after your room name, as you'll soon see it would be redundant. I later removed it.

Step 4 - Caseta App - Add Room Confirmation
I also selected the Outdoors option, and then a confirmation screen displays.

Step 5 - Caseta App - Type
The final screen asks you what light type you are controlling. I selected "Landscape Lights," which made my first entry of "lights" earlier redundant. I could have chosen "other," but I thought it better to change my earlier entry.

Step 6 - Caseta App - Type, Adding Device
The next screen tells you the app is installing your new device.

Step 7 - Caseta App - Device Added
You're then given a choice to add another device or finish the setup procedures. I exited the setup process.

Step 8 - Caseta App - Done Adding Devices
One final processing screen displays. After this finishes, the new Caseta switch will have been added to your Smartphone app and configured on your Caseta Smart Bridge.

Step 9 - Caseta App - Driveway Lights
Once the processing finishes, you are now able to control your new switch using the app. Doing this is easy. Press your new device displayed in the app, and the screen displays an option you can use to turn the light on or off.

Add New Schedules - The Automatic Light Timer
As mentioned earlier, I wanted the new driveway lights to work automatically with a pre-programmed schedule as follows:
This complete Schedule is going to require adding four new scheduled actions in the app. I will walk through one of them; the other three would be very similar.
Step 1 - Caseta App - Schedules
The first step is to select the Schedules tab on your Caseta app.

Step 2 - Caseta App - Add Schedule
This action will bring you to a screen where you can display your existing schedules and optionally Add a Schedule, which I need to do here.

Step 3 - Caseta App - Add Schedule, Days
The app will ask you which days of the week you want this Schedule enabled.

Step 4 - Caseta App - Add Schedule, Time
The next screen will then ask you for the time of day or, in my case Sunrise/Sunset. I chose Sunset for my first Schedule action.

Step 5 - Caseta App - Add Schedule, Name
The next screen will ask you for a name for this new Schedule. I experimented with this a bit, so the value shown below is not what I finally used.

Step 6 - Caseta App - Add Schedule, Devices
The next screen asks you which devices you want to control with this Schedule. I have only one installed at this point, so I selected it.

Step 7 - Caseta App - Add Schedule, Device Lighting Level
Once you choose it, you have an option to either turn it on or off. I wanted to turn mine on at Sunset automatically.. Clicking the Done button at the top right finishes the adding of this Schedule action.

Step 8 - Caseta App - Edit Schedule
It is easy to change the Schedule later on. You can edit any of the options you selected during the wizard walk-thru. You can also delete the Schedule if you no longer want it.

Step 9 - Caseta App - Add Schedules Completed
After adding three more schedule actions and playing around with the descriptions a bit, this is what I ended up using. Long Schedule descriptions are truncated, and you'll see the three ellipsis symbols instead. After seeing this, I simplified it so I could see the entire Scheduled action name.

Products Used in this Installation
-
 $64.95Learn More
- PEACE OF MIND: Set lights to adjust with seasons automatically, so your family always comes back to a well-lit home; enable smart away to randomly turn your lights on/off to look like you’re home even if you’re away (Caséta Smart Hub, L-BDG2-WH, required)
- MOST CONNECTED: Caséta connects with more leading smart home devices – including Amazon Alexa, Apple HomeKit, the Google Assistant, Ring, Serena shades, and Sonos – than any other innovative lighting control brand (Caséta Smart Hub required)
- CONTROL YOUR WAY: Caséta puts the smarts in the switch so you can control a variety of ways – via the free Lutron app, your voice, or from the wall; schedule lights to change at set times or activate scenes with the touch of a button (Caséta Smart Hub required)
We earn a commission if you make a purchase, at no additional cost to you.
07/25/2026 11:04 pm GMT -
$8.20$6.19Learn More- Accent any wall covering with a wide selection of colors and finishes.
- A smooth face and rounded edges resist dust accumulation.
- Molded thermoplastic for maximum resistance to impact, abrasion, fading, and discoloration.
We earn a commission if you make a purchase, at no additional cost to you.
07/26/2026 07:11 am GMT -
$38.99$35.98Learn More- Quick Change Drill Chuck - Comes with 3 Jaw Universal Chuck applying better stability on your projects, allowing you to change accessories on the Rotary machine tool freely. GOXAWEE Multi Chuck accepts accessories from 1/64” to 1/8” shank, wider compatible than others. Ideal when the application requires numerous accessory changes.
- 140pcs Attachment & Accessory - Flexible Shaft holds like a pen for your special projects. Cover Shield provides better protection for cutting and grinding. Drill Locator helps with precision work on wood. Diamond Cutting Wheel is the best tip for glass, ceramic, floor tile, etc. Versatile accessories include a pair of extra carbon brushes, rescuing you from searching new set and saving money.
We earn a commission if you make a purchase, at no additional cost to you.
07/26/2026 03:22 pm GMT -
 Learn More
- Brand: Lutron
- Part No.: L-BDGPRO2-WH.Supports Siri and Apple HomeKit technology
- Wattage: 1.3 Watt
- Color: White
We earn a commission if you make a purchase, at no additional cost to you.